Control Window

The Control window contains the Transition, Effect and Transport controls of MixEmergency.
This window can be shown/hidden from the Window menu, the Control window button on the Main window, or by using the keyboard shortcut ⌘3.
Transition View
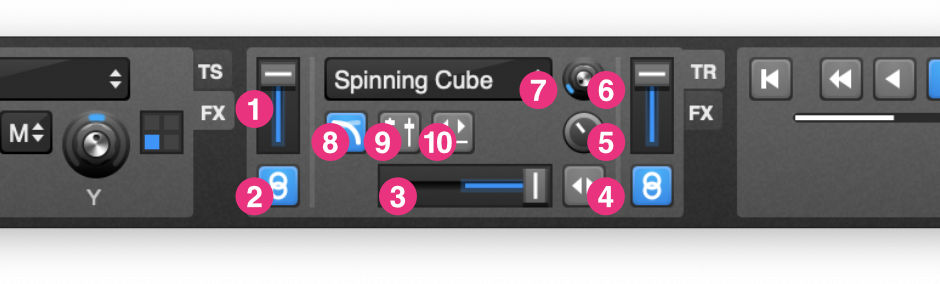
The Transition view lets you control the output mix of your media sources.
- Upfader Control - Controls the brightness of the media source.
- Upfader Link - Links the Upfader of your mixer to the Upfader Control.
- Crossfader - Controls the mix between the current media sources.
- Autofade - Automatically moves the Crossfader to the opposite media source from the one displayed.
- Autofade Time - Adjusts the duration of the autofade.
- Transition Parameter - Allows customization of some transitions.
- Transition Select - Selects the transition to use when mixing the media sources. A more detailed explanation of the transitions is available in the Transitions section of the manual.
- Link Crossfader - Links the Crossfader of your mixer to the Crossfader control.
- Link Upfaders to Crossfader - Links the Upfaders of your mixer to the Crossfader control.
- Link Crossfader to Autofade - Links the Crossfader or your mixer to the autofade function.
Transport View
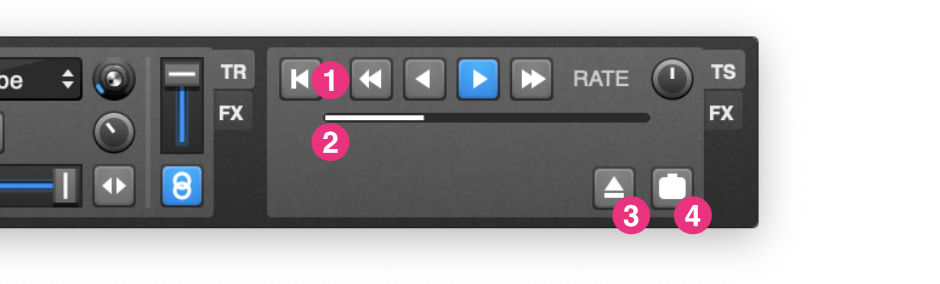
The Transport view is on the first tab to either side of the Transition view.
- Transport Controls - Allow you to restart, rewind, play backward, play forward or fast forward the media. There is also a Rate control to adjust the rate of playback. These are disabled when controlled externally.
When controlled by an external application, these buttons change to a Link with Audio button that can be used to link audio in the external control application with video or Quartz Compositions playing in MixEmergency.
- Media Progress - Displays the current play position of the media (disabled for media without a duration - e.g. images, Quartz Compositions, etc). The progress bar will be colored red if the file is not recommended for video scratching.
- Eject - Ejects the media from the deck.
- Capture Image - Captures an image from the current Channel Preview view to be used in the Media Bank.
Effect View
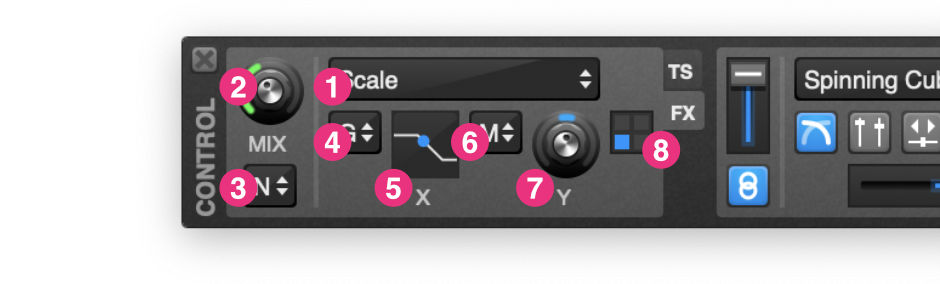
The Effect view, on the second tab to either side of the Transition view, allows you to apply effects to the media sources. These are applied before the transition effect.
- Effect select - Selects the effect to apply.
- Effect mix - Controls the mix between the original source and the effect.
- Effect blend mode - Controls the blending mode for the effect.
- Effect Parameter 1 Control Select - Selects the control mode for Effect Parameter 1.
- Effect Parameter 1 - Controls the first effect parameter.
- Effect Parameter 2 Control Select - Selects the control mode for Effect Parameter 2.
- Effect Parameter 2 - Controls the second effect parameter.
- Beat Display - Displays the current beat of the media.