MixEmergency supports MIDI control of almost all controls available on screen (such as the faders, transition select menu and loading media from the media bank). You can easily use a MIDI capable mixer to control MixEmergency.
MixEmergency also supports MIDI output (also commonly referred to as "MIDI feedback") - allowing you to sync compatible MIDI gear with the on-screen state of MixEmergency's controls.
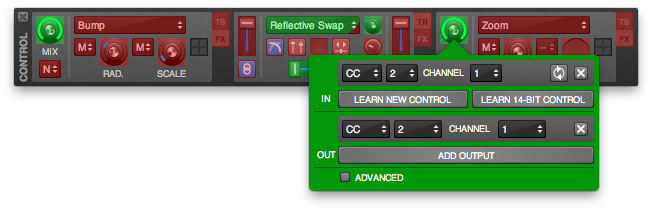
To toggle MIDI mapping mode, push the MIDI button on the Main window of MixEmergency. All MIDI mappable controls will display whether they have been MIDI mapped when this mode is on. Controls that have a MIDI mapping will appear green, while those that have not will appear red.
To assign a MIDI control to an on-screen control:
To clear an assigned MIDI control:
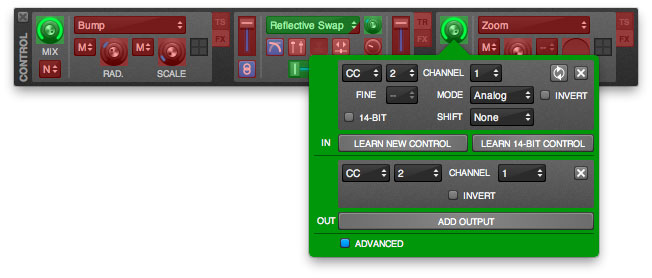
The MIDI mapping pop-up panel contains a button that enables the Advanced MIDI mapping mode. This mode enables further options for your MIDI mapping. Also note that you can map multiple MIDI controls to a single control in MixEmergency.
The Advanced MIDI input mapping options are:
The Advanced MIDI output mapping options are:
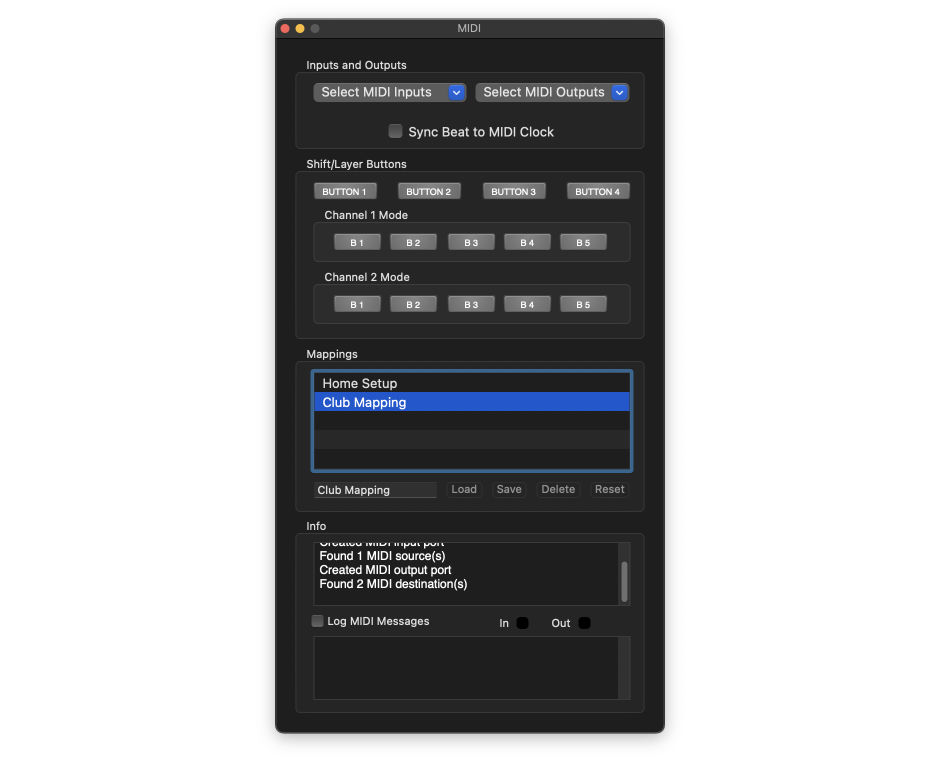
This window can be shown/hidden from the Window menu, or by using the keyboard shortcut ⌘8.
Here you can select which MIDI input and output devices MixEmergency will send to (outputs) and receive (inputs) MIDI messages from.
You can also set MixEmergency to sync all beat-related features to an incoming MIDI Clock signal.
These MIDI mappable buttons can be used in conjunction with the "Shift" section of the MIDI mapping pop-up windows.
The Mappings section of the MIDI window allows you to load, save and delete MIDI mappings for MixEmergency.
To load a MIDI mapping:
To save a MIDI mapping:
To delete a MIDI mapping:
This section of the MIDI Window displays information about the current MIDI sources and the data received from these sources.
The Info section can be used to verify that your MIDI device is communicating correctly with MixEmergency. When the Log MIDI Messages check-box is enabled, MIDI data received by MixEmergency will be logged in the lower text view.
The "In" and "Out" lights will briefly change to green when a MIDI message is sent or received.
It is recommended that you use the MIDI logging function only if you encounter problems assigning MIDI controls within MixEmergency. During live performance it is recommended that MIDI logging is disabled.