Presets Window
The Presets window can be used to store and recall effect, transition, text overlay, image overlay, Quartz Composition overlay, Video Input overlay, FX Sequencer sequence, Mixer FX mapping, Media Bank, and Sample Player settings.
You can toggle the display of the Presets window from the Window menu or by using the Presets window button on the Main window.
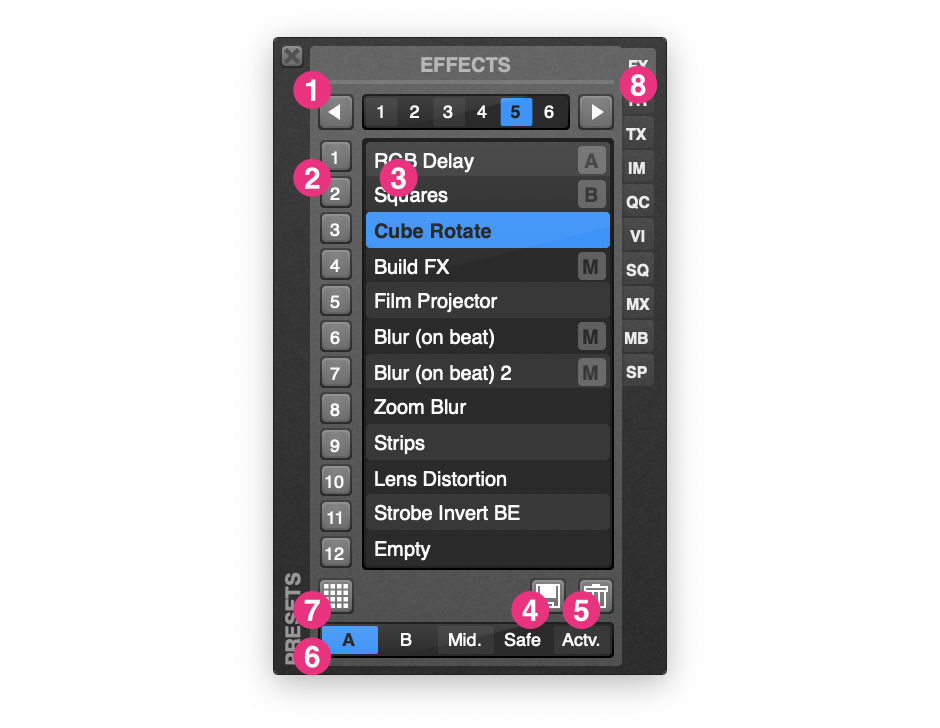
Each effect preset panel can store six banks of twelve presets (i.e. 72 presets in total).
- Preset Bank - Selects the current preset bank.
- Preset Trigger - These buttons can be used to trigger an effect preset.
- Preset List - This list displays the presets currently assigned to the bank.
Selecting these will not trigger a preset, but allows you to select preset slots to either save or delete a preset to.
Double-click on a preset to rename. For effect presets, right-click on a preset to assign a specific target (A, B, Mid.).
- Save Preset - Clicking this button will save the settings of an effect or transition as a preset from the currently mapped channel into the currently selected preset slot.
- Delete Preset - Clicking this button will delete the preset from the currently selected preset slot.
- Preset Channel - This control allows you to select the target for effect presets.
- Preset Trigger MIDI Mapping Mode - When this is disabled, you can map the 1-12 preset trigger buttons to MIDI controls, then use the Preset Bank control to switch between banks.
When this is enabled, you can map each trigger, within each bank, separately. The current Preset Bank has no effect on preset triggers, allowing mapping up to 72 individual presets to MIDI controls.
- Preset Tab - Here you can navigate between the different types of presets.
The Preset Channel control is only available for effect presets. It has five options:
- A - The first media channel (left) is selected for presets.
- B - The second media channel (right) is selected for presets.
- Mid. - The middle channel is selected for presets.
- Safe - The channel that is not currently visible on the output is selected for presets. A lighter selection color will also indicate which of the channels (A, B or Mid.) is the current target.
- Actv - The channel that is currently visible (or active) on the output is selected for presets. A lighter selection color will also indicate which of the channels (A, B or Mid.) is the current target.
Saving Presets
To save an effect preset:
- Select the desired settings for the effect preset using the effect controls on the Control window.
- Use the Preset Channel control to select the channel that you have used to set up the effect settings (i.e. A for the left channel, B for the right channel, or Mid. for the middle/output channel).
- Select the slot to save the preset to using the Preset List.
- Click the Save Preset button.
Importing and Exporting Presets
To export a preset:
- Right-click on the preset you want to export.
- Select Export Preset.
- Enter the name that you wish to save the preset as.
To import a preset:
- Right-click on the preset you wish to replace.
- Select Import Preset.
- Navigate to the preset that you wish to import.
You can also drag a preset file from the macOS Finder onto the Preset List to import it.