Welcome to the MixEmergency (3.5.4) manual.
MixEmergency is an application designed to mix and scratch video and visualisations. It has the ability to be controlled externally by Scratch Live or Serato DJ. MixEmergency is a visualisation application only and does not handle any audio processing.
You can download a demo version of MixEmergency from http://www.inklen.com/mixemergency/. It is recommended to download and try MixEmergency on your system before you purchase a license key to ensure that it fits your needs and meets your performance requirements.
License keys can be purchased online from http://www.inklen.com/mixemergency/.
1 For external control
To fully activate MixEmergency requires a valid authorization code. This can be purchased online at: http://www.inklen.com/mixemergency/
Once purchased you will receive your authorization code via e-mail.
To authorize MixEmergency:
MixEmergency supports mixing and scratching1 of a range of files playable in macOS. It is recommended that you test your media files before performing live to avoid any unforeseen issues.
1 Requires external control via Scratch Live or Serato DJ
MixEmergency officially supports and recommends the following video container formats: mp4, mov, m4v and the following video codecs: H.264, HEVC (H.265) MPEG-4, HAP, ProRes, Motion JPEG, Apple Intermediate Codec.
MixEmergency can import most image formats recognised by macOS. It is also capable of playing animated GIF images.
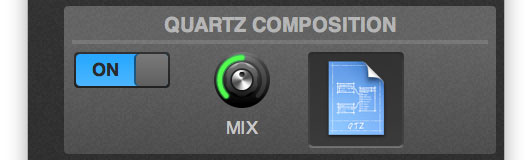
MixEmergency supports the loading and playing of Quartz Compositions (.qtz files).
MixEmergency supports the loading and playing of CDG files.
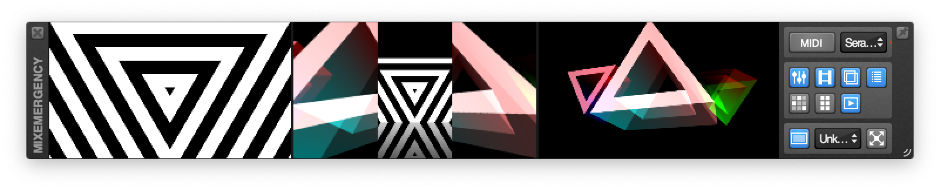
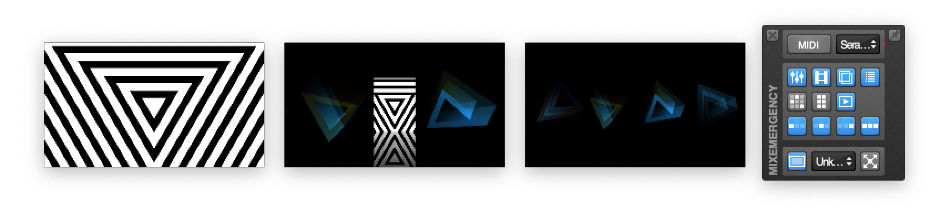
The main window of MixEmergency displays the channel and output preview views as well as several frequently used controls (described below). This window can be shown/hidden from the Window menu, or by using the keyboard shortcut ⌘1. You can toggle this window to float above all other windows by pushing the "pin" button on the top right of this window.
Right-clicking on the left or right Preview View will open a pop-up menu with options to:
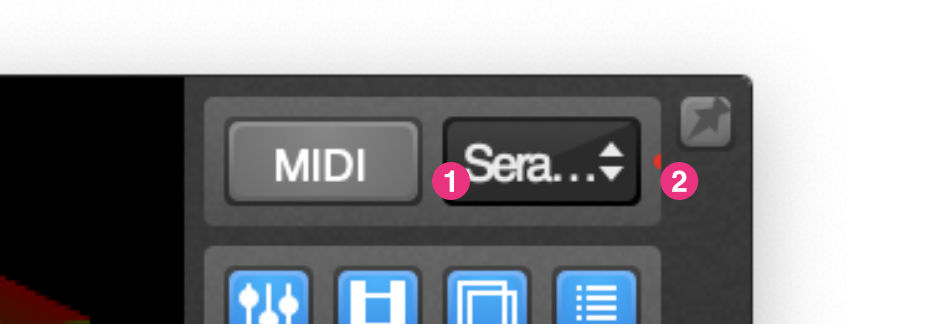
MixEmergency has the ability to act as a "plug-in" for Serato DJ. This allows Serato DJ to control aspects of MixEmergency such as play position, mix and current media.
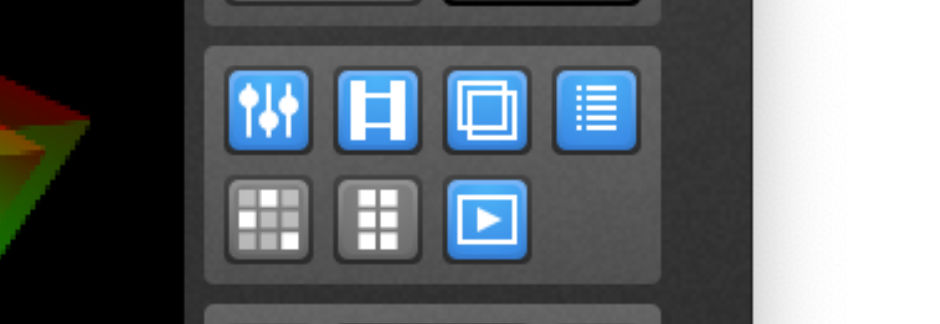
The panel control buttons allow you to toggle a number of MixEmergency's windows. The MIDI button, above this section, toggles the MIDI mapping mode.
The main window is split into four windows when using the Multiple Window Preview layout. Three of the windows contain the channel preview views, while the fourth contains the external, panel and full-screen controls.

The Control window contains the Transition, Effect and Transport controls of MixEmergency. This window can be shown/hidden from the Window menu, the Control window button on the Main window, or by using the keyboard shortcut ⌘3.
![]()
The Transition view lets you control the output mix of your media sources.
![]()
The Transport view is on the first tab to either side of the Transition view.
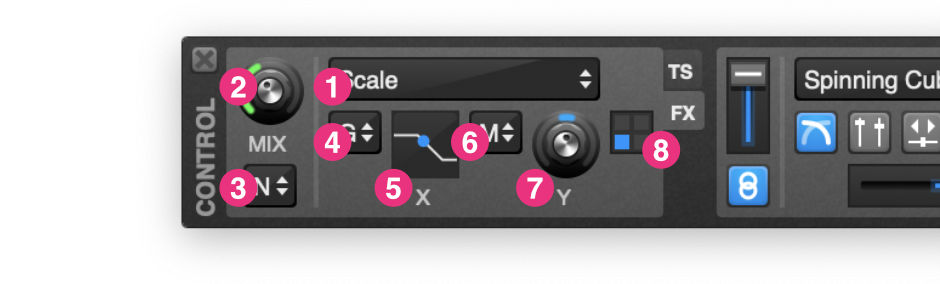
The Effect view, on the second tab to either side of the Transition view, allows you to apply effects to the media sources. These are applied before the transition effect.

The Media Bank is a place to store media that you may use often or for ambient video/Quartz Compositions (there is an option in the Preferences to load these automatically when a song without a video is loaded in Serato DJ). You can toggle the display of the Media window from the Window menu, the Media window button on the Main window, or by using the keyboard shortcut ⌘4
To load media into the Media Bank simply drag and drop files from the Finder onto the desired position.
You can drag an entire folder onto this area to have MixEmergency scan and load the contents of the folder. When using this folder mode, MixEmergency is able to load more than 16 clips into the Media Bank.
Clicking on an entry in the Media Bank will load the media to the deck that is not currently displayed on the output window. This is a feature to avoid situations where you may accidentally load media onto the live deck. You can also drag and drop media from the Media Bank directly onto a deck to bypass this safety feature.
Right-clicking on an item in the Media Bank will open a pop-up menu with options to:
You can assign MIDI controls to individual media entries by following the instructions in the MIDI section of the manual.
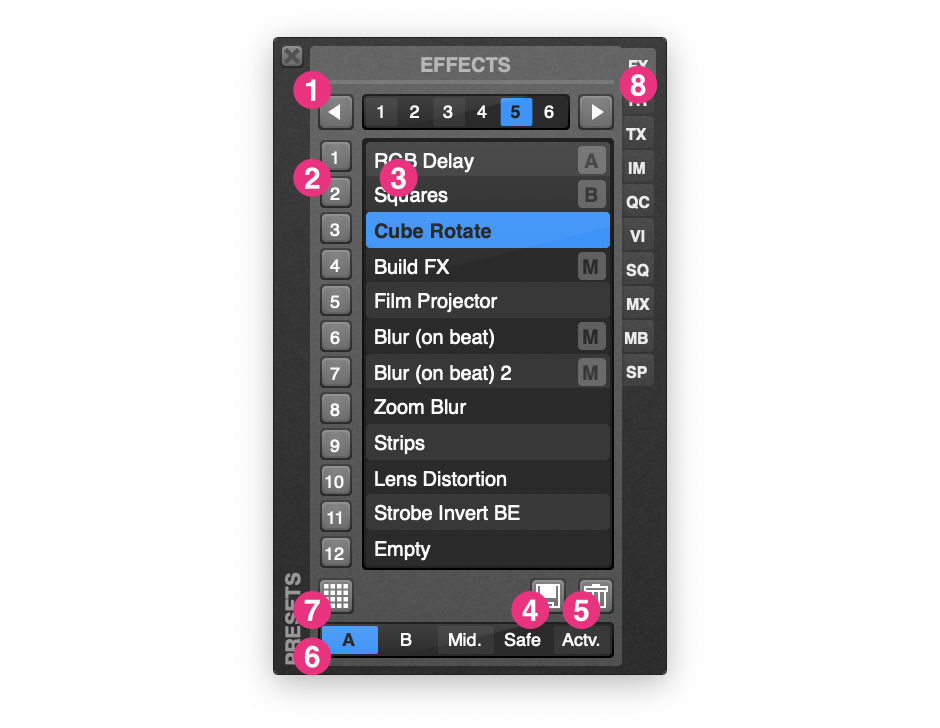
The Presets window can be used to store and recall effect, transition, text overlay, image overlay, Quartz Composition overlay, Video Input overlay, FX Sequencer sequence, Mixer FX mapping, Media Bank, and Sample Player settings. You can toggle the display of the Presets window from the Window menu or by using the Presets window button on the Main window.
Each effect preset panel can store six banks of twelve presets (i.e. 72 presets in total).
The Preset Channel control is only available for effect presets. It has five options:
To save an effect preset:
To export a preset:
To import a preset:
You can also drag a preset file from the macOS Finder onto the Preset List to import it.
The Mixer FX window contains controls that allow you to map the High, Mid., Low, Filter, and FX section of your mixer to visual effects in MixEmergency. This window can be shown/hidden from the Window menu, or by using the Mixer FX window button on the Main window.
The High, Mid., and Low controls are automatically mapped to your Rane mixer or most Serato DJ controllers when Serato DJ is running. The Filter and FX sections require manual MIDI mapping.
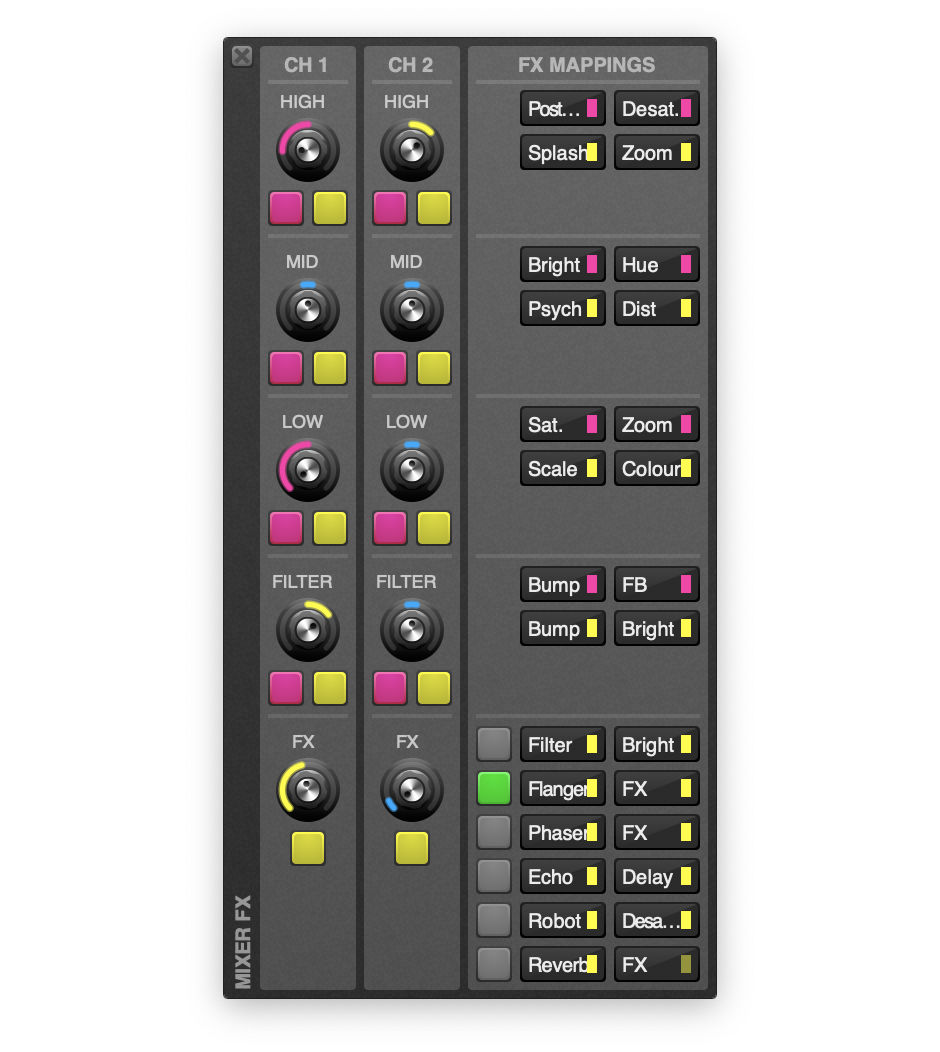
The Mixer FX view contains the basic controls for mapping visual effects to your mixer's controls. This view has 2 channel strips, and one effect mapping area.
For the High, Mid., Low, and Filter sections, there are 4 individual mapping sections. Those coloured Pink are for the counter-clockwise direction of the corresponding knob. Those coloured Yellow are for the clockwise directino of the corresponding knob.
In the FX section, there are 12 individual mapping sections. Only 2 of these are applied at one time. The mappings to be applied are selected using the green buttons to the left of the mapping sections.
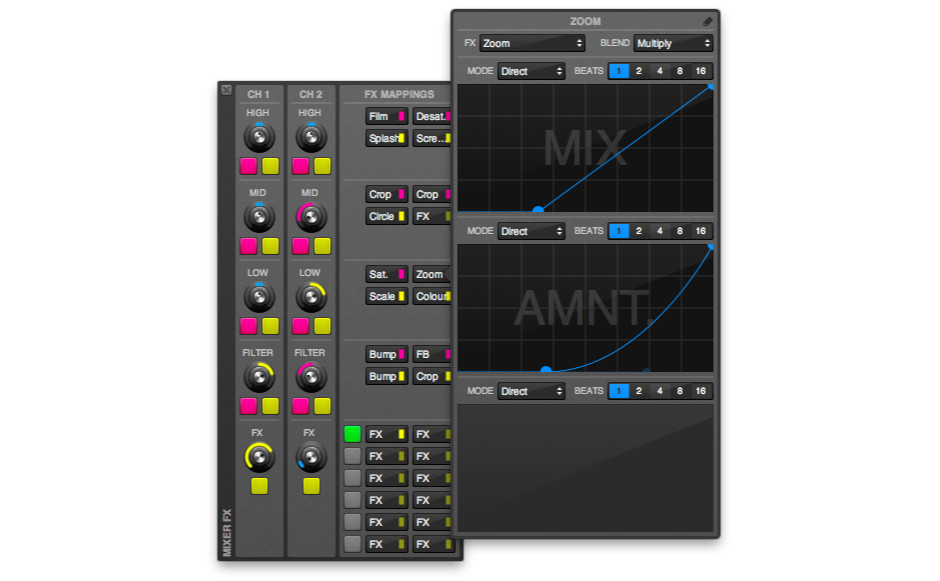
The Mixer FX Edit View allows you to edit how the position of the corresponding knob will control the visual effect.
The view contains controls to edit the Title, select the effect (FX), select the Blend Mode, and 3 sections that allow you to map the Mix, Parameter 1, and Parameter 2, of the selected effect.
Within the 3 mapping sections, you can select the Mode (Direct, or Beats), the number of Beats (for the Beat mode), and edit the graph of how the knob or beat position will be applied to the parameter.
The vertical axis of each Mapping Graph corresponds to the parameter value (e.g. 0%-100%).
When the Direct Mode is selected, the horizontal axis of the Mapping Graph corresponds to the distance from the resting point of the knob (the center for the High, Mid., Low, and Filter knobs, and fully counter-clockwise for the FX knob). There are 2 indicators (an orange point for Channel 1, and a pink point for Channel 2) that indicate the current mapping position when the knob is moved.
There are 3 graphs within the Mapping Graph when the Beat Mode is selected. You can choose which one to edit by clicking either the Blend, Start, or End buttons that will appear along the top of the Mapping Graph. The first graph is the Blend Graph. The horizontal axis for this Graph corresponds to the position of the knob, and the vertical axis corresponds to the blend between the Start and End graphs (0% = the Start Graph, 100% = the End Graph). The other two graphs (Start and End) have a vertical axis that corresponds to the effect parameter (e.g. 0%-100%). The horizontal axis of these Mapping Graphs corresponds to the position within the number of beats selected by the Beats control.
The Mix, Parameter 1, and Parameter 2 mapping graphs allow you to create complex animations.
To add a new point:
To remove a point:
To extend a control point (for a smooth bezier curve):
To have fine control over a point:
The Sample Player is designed to allow you to play up to 8 media clips (loops, samples, etc) over MixEmergency's output.
The Sample Player is not linked directly to Serato DJ's Sample Player, so it is also possible to use other audio applications to trigger/play audio samples alongside it.

The Sample Player Window contains 2 sections.
To the left are the 8 Samples. Each contains a Sample Preview View, a Stop button, an Eject button, and an Edit button. Clicking on the Sample Preview View will cause the Sample to trigger. This can also be mapped to a MIDI control.
To load a sample, simply drag and drop a media file onto the corresponding Sample Preview View.
To the right are 3 controls. The Bank buttons control which of the 4 banks of samples is currently loaded. The Out buttons control which channel of MixEmergency the samples will be output to (A = left, B = Right, M = Master). The Mix knob controls the wet/dry mix of the samples over the output.
Samples are composited from left to right (i.e. each sample to the right is rendered over the previous one to the left). To rearrange the samples, simply drag and drop their Sample Preview View between the other samples.
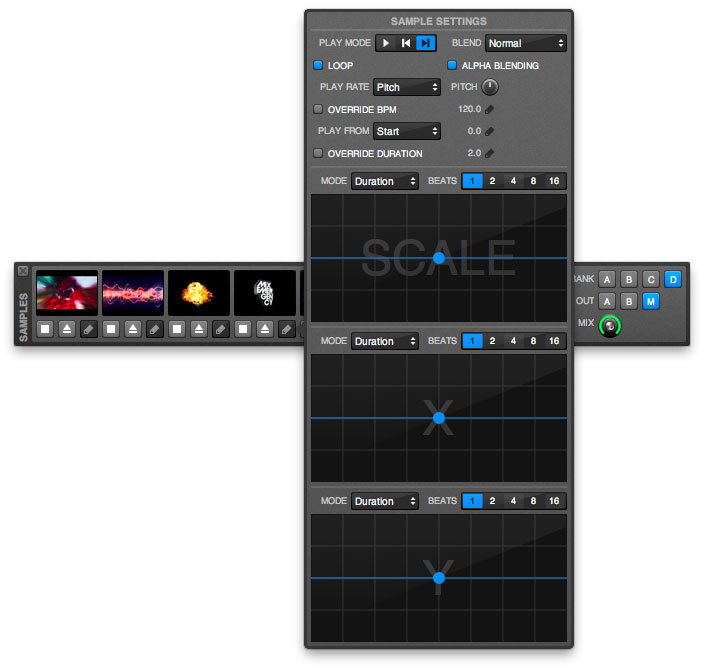
Clicking on the Edit button below a sample will open the Sample Settings Edit View. This contains a number of settings that can be adjusted for each sample.
Below this are 3 areas for animating the Scale, X, and Y position of the sample.
The Mode control allows you to select whether the animation is applied over the Duration of the sample, or synced to a number of Beats of the underlying music (the number of beats is selected with the control labelled Beats to the right).
To reset any of these graphs, right-click (or control-click) on the graph and select Reset.
If you're playing video samples or loops, it is recommended that you encode your video using the Hap video codec, as MixEmergency can utilise your GPU to decode and playback the video, freeing up your computer's CPU.
The FX Sequencer window contains controls that allow you to sequence and animate effect patterns in MixEmergency. This window can be shown/hidden from the Window menu, or by using the FX Sequencer window button on the Main window.
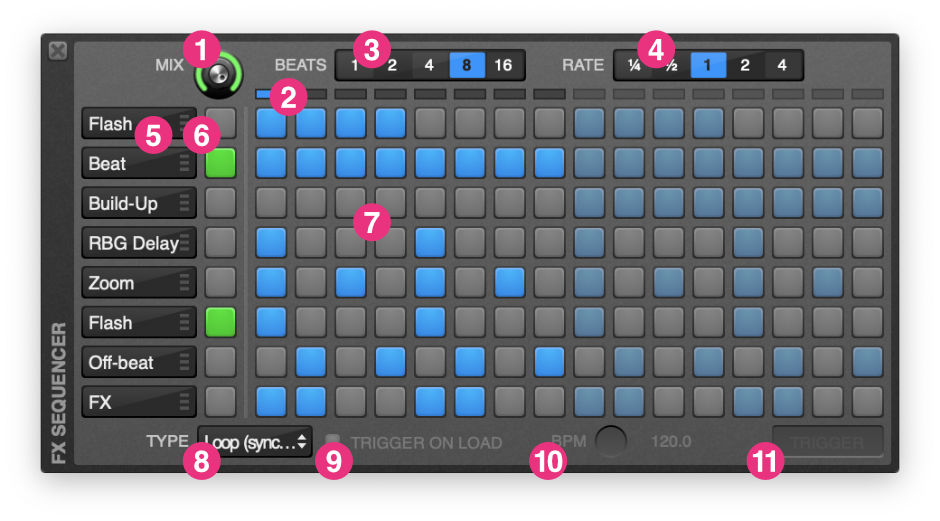
The FX Sequencer view contains the basic controls for sequencing and blending your effect sequences.
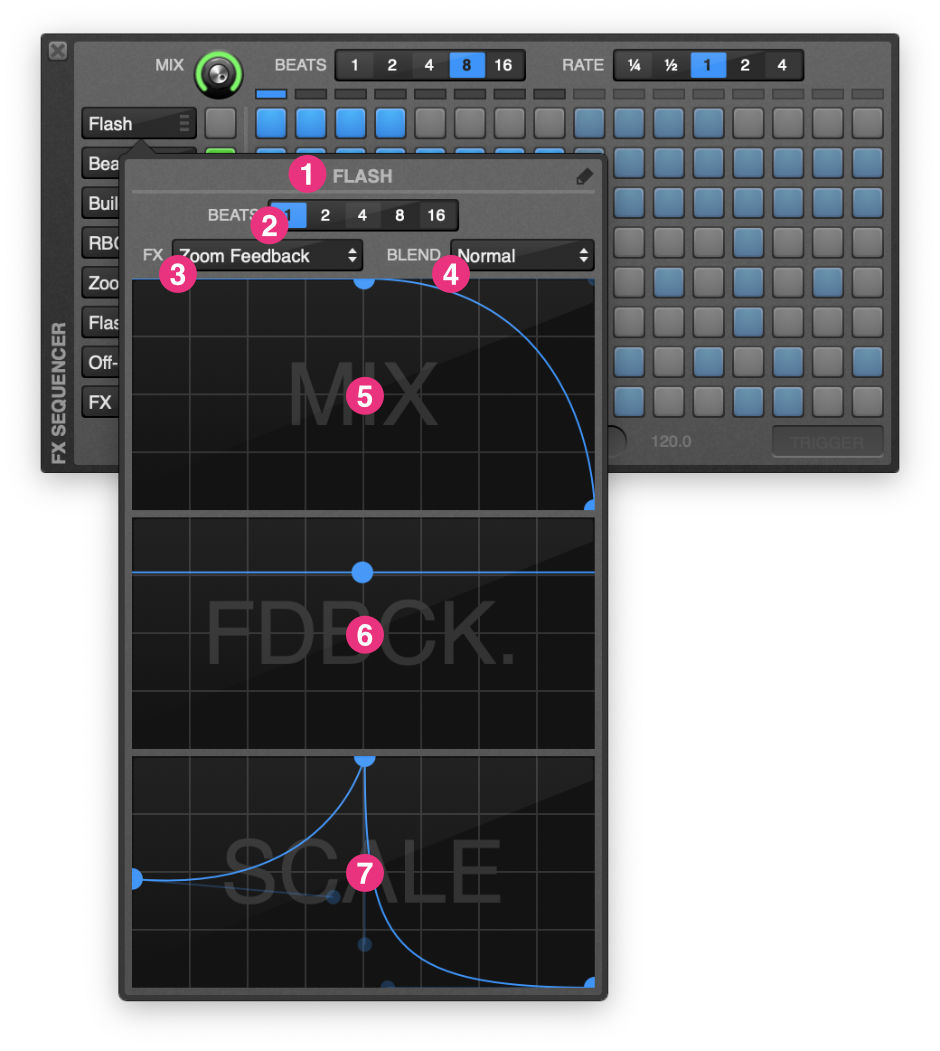
The FX Sequencer Edit View allows you to edit the effect.
The Mix, Parameter 1, and Parameter 2 mapping graphs allow you to create complex animations.
To add a new point:
To remove a point:
To extend a control point (for a smooth bezier curve):
To have fine control over a point:

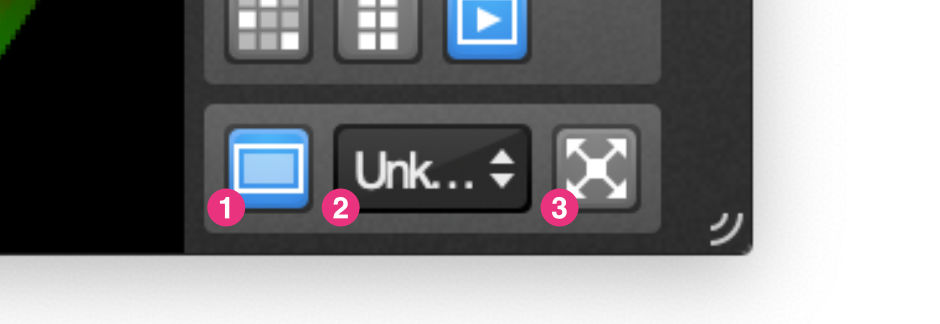
This window can be shown/hidden from the Window menu, the Output window button on the Main window, or by using the keyboard shortcut ⌘2.
To resize the Output window, click and drag the bottom-right corner of the window. To move the window, click and drag anywhere else within the window.
To control MixEmergency from Serato DJ:
Controlling MixEmergency from Serato DJ is as easy as loading videos in Serato DJ, or dragging Quartz Compositions onto MixEmergency and linking them to the currently loaded audio file in Serato DJ.
To control MixEmergency from Scratch Live:
Controlling MixEmergency from Scratch Live is as easy as loading videos in Scratch Live, or dragging Quartz Compositions onto MixEmergency and linking them to the currently loaded audio file in Scratch Live.
Note: If you're not using Scratch Live 2.3.3 or higher, then to import videos into your Scratch Live library you need to download and install the demo version of Video-SL and check "enable Video-SL plugin" in the plugins tab of Scratch Live's setup screen.
You can choose from a range of transitions to mix between your media sources. As of MixEmergency 3.3.0, all previous transition plug-ins are now built into MixEmergency. If you're using a version earlier than this then you will need to download and install these separately. A description of just some of the transitions is available below:
You can choose from a range of effects to apply to your media sources. As of MixEmergency 3.3.0, all previous effect plug-ins are now built into MixEmergency. If you're using a version earlier than this then you will need to download and install these separately.
Most effects have either one or two effect parameters that can be adjusted. The adjustments of these effects can be assigned to one of the following controls (this varies depending on the source of the effect).
Using these controls you can quickly and easily add effects that react dynamically to mixing and scratching.
When controlling the effect parameter with the Position control, the knob that appears to the right controls the rate of the effect.
When controlling the effect parameter with the Velocity control, a mapping graph will appear to the right. Clicking on this mapping graph will pop out a larger editing view.

The vertical range corresponds to the effect parameter, and maps directly onto the range of the effect parameter knob. The second range corresponds to velocity, and maps the velocity of the media. This is an advanced function of the program, and may take some time to get used to.
The mapping graph has three parts: two mapping points and a mapping indicator. The mapping points can be repositioned by dragging the points around the graph. The mapping indicator is a blue dot that will automatically move to show the currently mapped position on the graph.
The effect parameter (vertical) range is from 0 to 10 (i.e. the same as the range on the effect parameter knob) and controls the range of the effect to control.
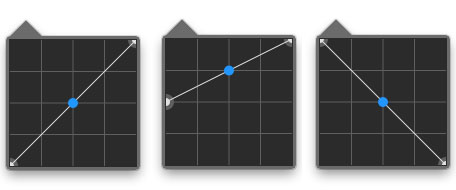
The above examples show:
The velocity (horizontal) range is from -2 to 2 and controls the range of the velocity to affect the control. At -2 the media would be playing backwards at double speed, 0 would be stopped, 1 would be playing forwards at normal speed and 2 would be playing forwards at double speed.
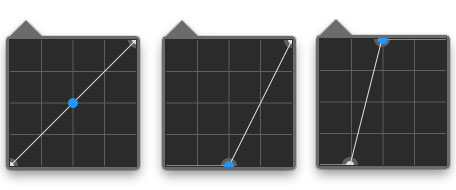
The above examples show:
The blue dot on the mapping graph gives an indication of how the current velocity is mapped.
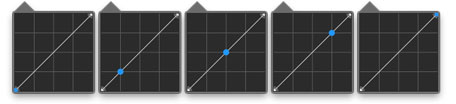
The above examples show:
Once you understand how these controls work, you will be able to quickly and easily create effects that compliment your video scratching.
The bass control mode graph is similar to the velocity graph. The only difference is that the horizontal axis represents the time since the bass triggered the effect parameter. When the bass triggers the effect parameter the blue mapping indicator will jump to the left of the graph and slowly move towards the right.
The Grid control mode graph is similar to the velocity graph. The horizontal axis represents one beat (as defined by a preset Beatgrid, or based upon the BPM of the currently loaded media). As the beat progresses it will shift from the left to the right.
Please note that, as of MixEmergency 3.3.0, all previous effect and transition plug-ins are now built into MixEmergency.
MixEmergency supports effect and transition plug-ins. These can be used to extend MixEmergency with new effects and transitions.
Plug-ins are in a format created exclusively for MixEmergency and use the same high-performance graphics technologies used in MixEmergency.
To install a plug-in for use withing MixEmergency.
Plug-in files have the extension "plugin" and are installed in the folder ~/Movies/MixEmergency/Plug-Ins/.
To remove a plug-in previously installed with MixEmergency.
The Overlay Window can be used to display text, images, Quartz Compositions, video input, NDI streams, Syphon streams, and border fills, over the output of MixEmergency. This window can be shown/hidden from the Window menu, or by using the keyboard shortcut ⌘5.
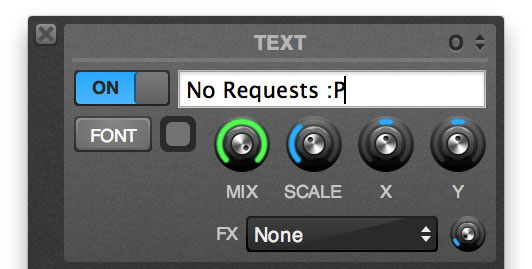
The Text overlay can be used to display static or scrolling text over the output of MixEmergency. The controls, in order from top left to bottom right are:
The Text Overlay Window is useful for adding short text titles or advertisements over the output.
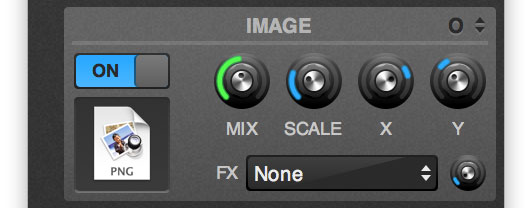
The Image overlay can be used to display a static image over the output of MixEmergency. The controls, in order from top left to bottom right are:
The Image Overlay Window is useful for adding titles, logos or advertisements over the output. It supports most image file formats that Quicktime can open.
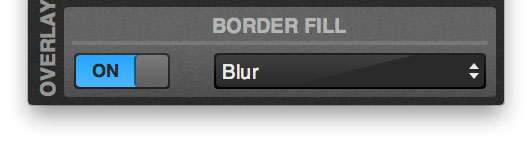
The Border Fill overlay differs from the other overlays in that it is applied to each channel prior to the channel's effects.
The purpose of this overlay is to fill in the "black bars" that are often seen on videos which have an aspect ratio that differs from the output aspect ratio. You can select from one of several effects to fill this space.
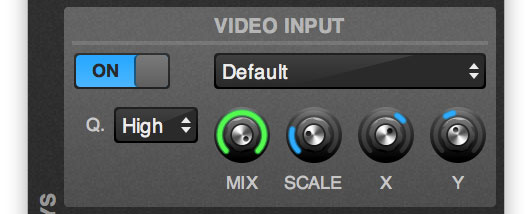
These overlays allow you to overlay a live video feed via either Syphon or a NDI input.
MixEmergency supports MIDI control of almost all controls available on screen (such as the faders, transition select menu and loading media from the media bank). You can easily use a MIDI capable mixer to control MixEmergency.
MixEmergency also supports MIDI output (also commonly referred to as "MIDI feedback") - allowing you to sync compatible MIDI gear with the on-screen state of MixEmergency's controls.
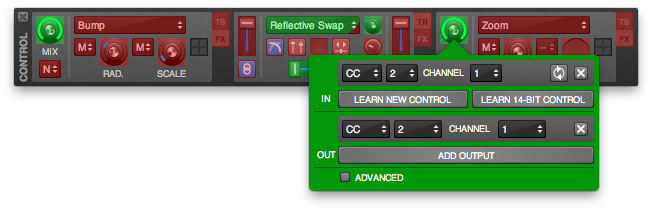
To toggle MIDI mapping mode, push the MIDI button on the Main window of MixEmergency. All MIDI mappable controls will display whether they have been MIDI mapped when this mode is on. Controls that have a MIDI mapping will appear green, while those that have not will appear red.
To assign a MIDI control to an on-screen control:
To clear an assigned MIDI control:
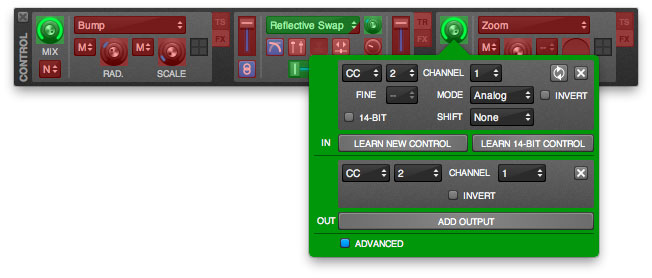
The MIDI mapping pop-up panel contains a button that enables the Advanced MIDI mapping mode. This mode enables further options for your MIDI mapping. Also note that you can map multiple MIDI controls to a single control in MixEmergency.
The Advanced MIDI input mapping options are:
The Advanced MIDI output mapping options are:
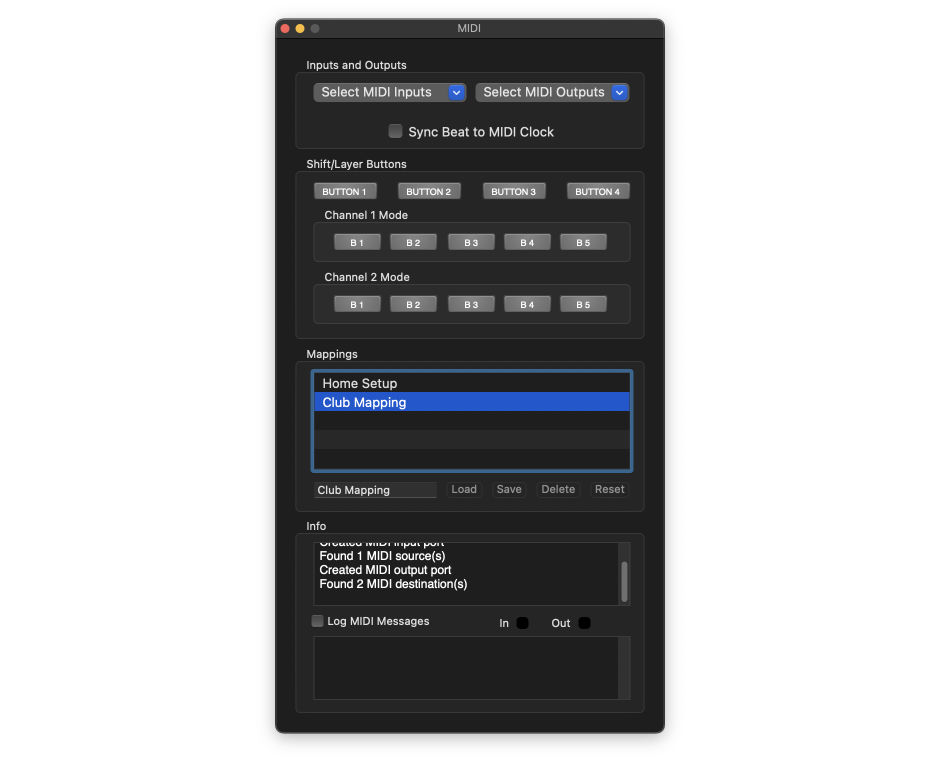
This window can be shown/hidden from the Window menu, or by using the keyboard shortcut ⌘8.
Here you can select which MIDI input and output devices MixEmergency will send to (outputs) and receive (inputs) MIDI messages from.
You can also set MixEmergency to sync all beat-related features to an incoming MIDI Clock signal.
These MIDI mappable buttons can be used in conjunction with the "Shift" section of the MIDI mapping pop-up windows.
The Mappings section of the MIDI window allows you to load, save and delete MIDI mappings for MixEmergency.
To load a MIDI mapping:
To save a MIDI mapping:
To delete a MIDI mapping:
This section of the MIDI Window displays information about the current MIDI sources and the data received from these sources.
The Info section can be used to verify that your MIDI device is communicating correctly with MixEmergency. When the Log MIDI Messages check-box is enabled, MIDI data received by MixEmergency will be logged in the lower text view.
The "In" and "Out" lights will briefly change to green when a MIDI message is sent or received.
It is recommended that you use the MIDI logging function only if you encounter problems assigning MIDI controls within MixEmergency. During live performance it is recommended that MIDI logging is disabled.
The preferences panel can be accessed through the application menu or the keyboard shortcut ⌘,
Layout - Allows you to select between the Single Window Preview layout and the Multi Window Preview layout (which splits the main MixEmergency window into three independently resizeable windows). Note that Single Window Preview layout is more efficient than the Multi Window Preview layout with regards to CPU and GPU usage.
Opacity - These controls set the opacity of the main application windows. This can be useful if you need to monitor another application while using MixEmergency.
Forward keyboard events - When this option is checked MixEmergency will forward any keyboard events (not including short-cuts used by MixEmergency) to the external controller application. This can be useful if you don't want to switch between the applications.
Disable conflicting shortcuts - When this option is checked MixEmergency will disable keyboard shortcuts that conflict with the application currently controlling MixEmergency.
Auto-hide menu bar and dock - When this option is enabled MixEmergency will auto-hide the menu bar and dock when MixEmergency is set to float above other windows.
Automatically load effects - Enables loading of previously saved effects when media is loaded.
Automatically save effects - Enables saving of the last used effect preset per media.
The Display preference panel allows you to control aspects relating to the output of MixEmergency.
Quality - This adjusts the quality of the rendered output level. If you're experiencing low frame rates on full-screen then you may need to lower this setting.
Scaling - There are four types of output scaling: Fit, Letterbox, Zoom and Stretch.
Arrangement - Controls the arrangement of panels on the output window.
Enable Frame Blending - This option enables frame blending for videos, resulting in smoother video when scratching at slower speeds.
Enable Anti-Aliasing - This option will apply an anti-aliasing filter to the output, which will result in smoother edges on the output image.
Enter full screen on startup - This option automatically activates full screen mode when the application launches. This will only occur when an external monitor is detected.
Flip Horizontal - Flips the output image along the horizontal axis.
Flip Vertical - Flips the output image along the vertical axis.
Enable Color Correction - Enables basic brightness, saturation and contrast controls for the output.
Brightness - Controls the brightness of the output.
Saturation - Controls the saturation of the output.
Contrast - Controls the contrast of the output.
Use Advanced Output - Enables the advanced output. This can be configured by pushing the button labelled "Configure".
Aspect Ratio - This sets the aspect ratio of the preview views. You can choose either None, 4:3 or 16:9.
Update Rate - The update rate of the preview views can be lowered using this control.
Reverse MIDI fader - This reverses the direction of any MIDI control assigned to the Crossfader.
Smooth fader - This enables Crossfader smoothing.
Random Transition includes - Use this to choose which transitions will be selected from when using the Random transition.
Auto-fade duration - This sets the duration of the auto-fade control.
Auto-fade Hot-key - This can be used to assign a global hot-key to the auto-fade button.
Stopping media triggers Auto-fade - Stopping one channel's media (e.g. pulling backwards on your external vinyl control) while this is enabled will cause MixEmergency to trigger an auto-fade to the opposite playing channel. This is useful when you don't have access to a MIDI controller or mixer.
Fader cut distance - Allows you to adjust the fader cut distance for the crossfader.
Use External Controller Crossfader - Enables the use of your External Controller's (e.g. Scratch Live) crossfader.
Use External Controller Upfaders - Enables the use of your External Controller's (e.g. Scratch Live) upfaders.
Use External Controller Cuefader - Enables the use of your External Controller's (e.g. Scratch Live) cuefader.
Enable - Enables contouring.
Crossfader - Adjusts the contour of the crossfader between slow and fast.
Upfaders - Adjusts the contour of the crossfader between slow and fast.
Use External Controller Contour - Enables the use of your External Controller's (e.g. Scratch Live) contour.
The two tables on this panel allow you to select and reorder the plug-ins that appear in your effect and transition lists.
The settings on the Advanced preference panel are recommended for more advanced users.
The main slider in this window controls the amount of memory MixEmergency will allocate for caching video frames.
Important: if using GPU-accelerated video decoding, it is recommended to set this value to around a 1/4 of the memory of your GPU (e.g. if your GPU has 1024 MB of memory, you would set the cache size to either 200 MB or 300 MB).
The pop-up menu allows you to select the default action when an unlinked audio file is loaded.
Enable GPU-Accelerated Video Decoding - This option will cause MixEmergency to attempt to use the GPU to decode H.264 encoded video. This can result in significantly reduced CPU usage. This only affects the main 2 channels (i.e. the Sample Player doesn't take advantage of this). Not all hardware is capable of GPU-accelerated video decoding.
Display Beat Views - This option toggles the visibility of the Beat Views on the effect panel of the Control Window.
Lower full screen window level - This option lowers the window level of the output when full screen. This can allow other windows to display on top of MixEmergency. This is not recommended for general use.
Synchronize Output to Screen Refresh - Turning off this option may result in better performance, but will result in poorer image quality.
Loop Media longer than 1 minute - Selects whether to loop videos longer than one minute in length.
Zero Alpha Channel - Enables clearing of the alpha channel. This is useful if you're compositing the output of MixEmergency in another program via Syphon.
Delay Compensation allows you to compensate for any delay in video or audio in your system so that your video and audio will always appear in sync.
Enable - Enables Delay Compensation.
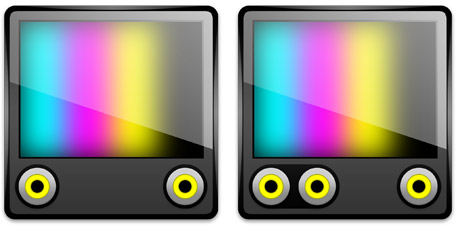
View Helper - When Delay Compensation is enabled, this will flash colours on both the preview views and the output screen. Use the Delay Compensation slider to align these.
Delay Time - Controls the offset for the delay compensation.
Below the slider are + and - buttons that allow you to offset the centre of the Delay Compensation slider by 1 second. This is useful if delay values are outside the range of the slider.
Size - Controls the size of the notification overlay.
Position - Controls the vertical position of the notification overlay.
Transition - When this is enabled, changing the Transition will trigger the notification overlay.
Transition Parameter - When this is enabled, changes to the Transition Parameter will trigger the notification overlay.
Effect - When this is enabled, changing the Effect will trigger the notification overlay.
Effect Parameter - When this is enabled, changes to the Effect Parameter will trigger the notification overlay.
"Syphon is an open source Mac OS X technology that allows applications to share frames - full frame rate video or stills - with one another in realtime."
These settings allow you to toggle output via Syphon to other Syphon enabled applications.
"NDI, NewTek’s Network Device Interface protocol, is new technology for ultra-connected, IP-based video production."
These settings allow you to toggle output via NDI to other NDI enabled applications.
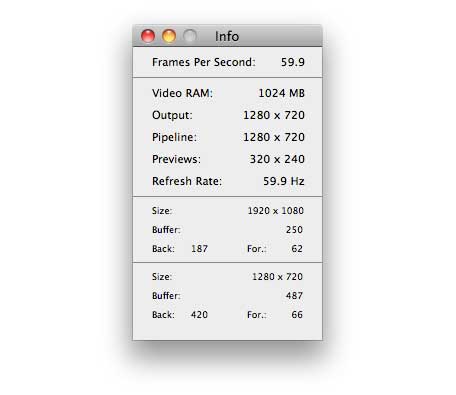
The Info Window displays information about the current output performance and the loaded media sources. This window can be shown/hidden from the Window menu, or by using the keyboard shortcut ⌘0.
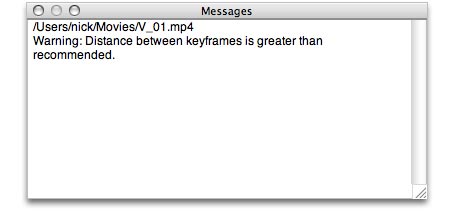
The Messages Window displays any warnings encountered when loading and playing media that may make the media unsuitable for complex mixing and scratching.
MixEmergency allows you to record and export your performance. Only a small amount of data is recorded during the recording stage so that your system's CPU is not put under unnecessary stress.

Recording your performance couldn't be easier. MixEmergency records the minimum amount of performance data needed to reconstruct your performance. If selected, MixEmergency will also record an audio stream to an uncompressed file.
To record your performance:
You can then use MixEmergency as you would normally.
To stop recording, simply push the "Stop" button on the Recording window.
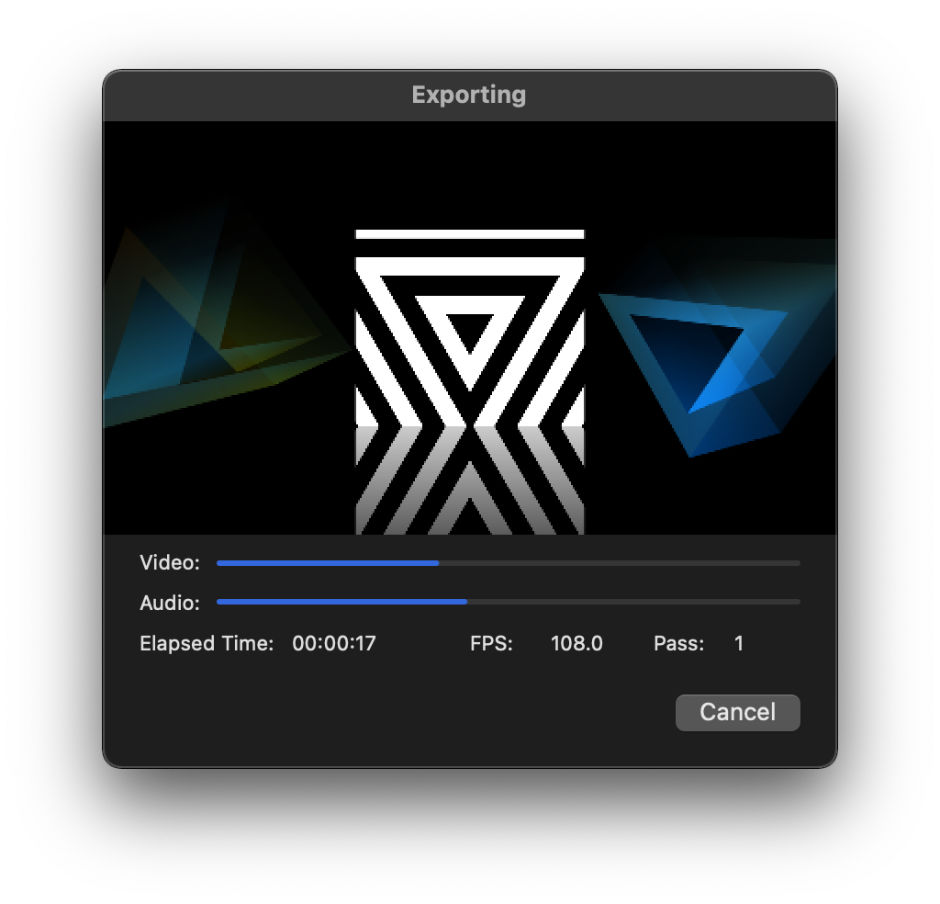
Previously recorded performances can be exported from MixEmergency. Exporting can take quite a while to complete depending on the length of your recording and the compression format you have chosen to export to.
Before exporting a performance make sure that all external drives that contain media used during the performance are connected to your computer.
To export your performance:
A window will appear while exporting that allows you to preview and monitor the progress of the export and to cancel the export if necessary.
It is impossible to give a compression setting that satisfies all users, as factors such as computer performance, desired output dimensions and the desired level of compression artefacts are different for each user. Finding an optimal compression setting for your videos may initially involve some experimentation using different formats and compressions presets to determine the optimal settings for your computer.
A few key areas of compression will help with the performance of MixEmergency. Video should be compressed with keyframes every 12 to 25 frames. Longer distances between keyframes will result in a lot of unnecessary decoding, and can degrade the performance of MixEmergency.
The dimensions of the compressed image will depend on the performance of your computer and the output device that you intend on displaying to. For most situations, 720P (1280 x 720 pixels) will be sufficient. If you experience poor performance, you may need to recompress your video at decreased dimensions or lower bitrates.
It is recommended that you compress your video as H.264 video in a mov or mp4 container.
There are currently 23 published inputs that are supported by MixEmergency. These can be used to allow your Quartz Composition to react to your controller (e.g. record velocity when controlled via Scratch Live).
Quartz Compositions are loaded at the current dimensions of the output display. If you experience low frame rates when playing Quartz Compositions, try lowering the Quality setting on the Display preference panel and then re-loading the Quartz Composition.
1 Only available when controlled by Serato DJ
2 Only available to Quartz Composition overlays
The Parameter Window allows you to edit published inputs of Quartz Compositions. There are two Parameter Windows - one for media 1, and one for media 2. These can be shown/hidden from the Window menu, or by using the keyboard shortcuts ⌘6 and ⌘7.
Published inputs that have the type Number and a valid minimum and maximum value are assigned slider controls. Published inputs that have the type Boolean are assigned check-box controls. Any control that is a slider or button can be controlled via MIDI using the Control Mapping element. To map a MIDI control to a published input, follow the MIDI assignment instructions in the MIDI section of the manual.
Other published inputs, such as those of type Image, String, Index or Color, are also supported in the Parameter Window.
A number of factors can influence the performance of MixEmergency. The following is a rough guide to some of the features that can influence MixEmergency's performance.
MixEmergency uses your computer's memory to store video frames in an attempt to optimize video decoding performance. If the memory on your computer becomes low, this can cause MixEmergency's performance to deteriorate. The level of memory used can be set in the Advanced panel of the preferences. You can check the level of your computer's free memory using the Activity Monitor application on macOS.
If using GPU-accelerated video decoding, make sure that MixEmergency's cache size is set to a lower value. Often a good setting is to set this at around 1/4 of the RAM available to the GPU. For example, if your GPU has 1024 MB of RAM, set MixEmergency's Cache Size to between 200 MB to 300 MB. Higher values may degrade performance.
The quality slider in the Output panel of the preferences can be used to tune performance. For example, if you were to output MixEmergency to an external screen of size 1280 x 720, and your videos are of size 640 x 480, then setting the Quality slider to medium would be appropriate. This would cause MixEmergency to render internally (transitions and effects) at 640 x 480 instead of 1280 x 720, and should improve performance while maintaining the quality of your videos. You can use the Info window to determine the output dimensions, and the quality adjusted dimensions (i.e. the render pipeline dimensions).
Some of the more complex transitions and effects can have an effect on performance. You should test your system with all the effects and transitions that you plan to use in a live situation beforehand.
For help with any other problems, please visit the Inklen support forum: http://www.inklen.com/forum/